The Dreamlink T1 and Dreamlink T2 are popular devices designed to give you easy access to IPTV channels. These devices come with a user-friendly interface based on Stalker Middleware, which converts IPTV channels into a well-organized menu. This allows users to effortlessly select and watch their favorite channels. The Dreamlink boxes are not just limited to IPTV streaming; they also come equipped with a web browser, a video player, and a variety of other applications.

If you’ve recently acquired a Dreamlink box and want to set up IPTV, this guide will show you exactly how to do it using the DreamOnline (DOL2) application. Whether you’re using Dreamlink T1 or T2, these steps will help you get started with IPTV streaming.
How to Add IPTV Channels to Dreamlink Box
Adding IPTV channels to your Dreamlink box is straightforward, and you can do it in just a few steps. Follow the instructions below to set up IPTV using DreamOnline (DOL2).
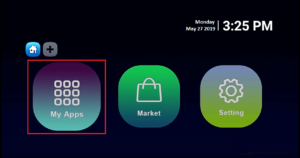
Step 1: Access My Apps
From the Dreamlink home screen, navigate to the “My Apps” section. This is where you can find all the applications installed on your device.
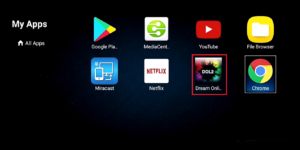
Step 2: Launch DreamOnline (DOL2)
In the “My Apps” folder, find and select DreamOnline (DOL2). If you don’t see it there, you can go to the Market folder, search for DreamOnline (DOL2), and install it. After installation, it will appear in the My Apps folder.
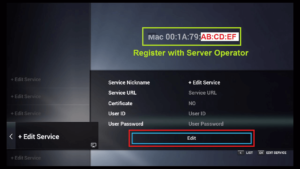
Step 3: Select “Edit Service”
Now, open the DreamOnline (DOL2) app and choose “Edit Service”. Then, click on “Click Edit” to begin the configuration process.
Important Note: Make sure you are registered with the correct MAC address on your Server Operator’s homepage (if necessary). This ensures that your Dreamlink device is properly authenticated.
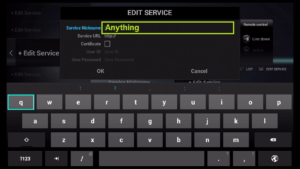
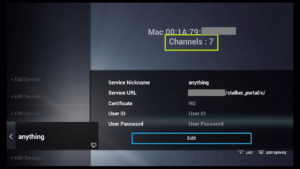
Step 4: Enter Service Nickname
Enter a Service Nickname of your choice. This name will help you identify the service you are adding.
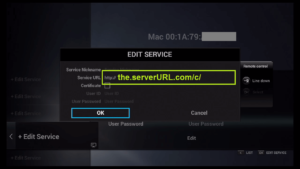
Step 5: Enter IPTV Server URL
In the IPTV Server URL (also known as the Portal URL), enter the URL provided by your Server Operator. This URL links your Dreamlink device to the IPTV service and gives you access to the available channels.
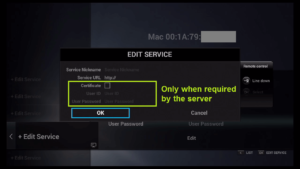
Step 6: Skip Username and Password
For most setups, you don’t need to enter a Username and Password. Simply leave these fields empty unless instructed otherwise by your server operator.
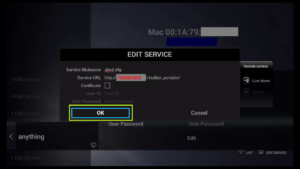
Step 7: Confirm and Save
Once all the necessary details are entered, click “OK” to save the settings.
Step 8: Connect to IPTV Server
Your Dreamlink device will now attempt to connect to the IPTV server using the registered data you provided. The connection process should take a few moments.
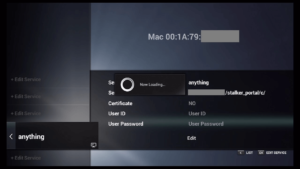
Step 9: Enjoy IPTV Channels
Once the connection is successfully established, you will receive all the IPTV channels linked to your account. You can now browse through the available channels and start enjoying live TV, movies, shows, and more.
Troubleshooting Tips for IPTV on Dreamlink Box
If you encounter any issues during the IPTV setup on your Dreamlink device, try the following troubleshooting tips:
- Check the IPTV Server URL: Make sure the Portal URL entered in the settings is correct. If the URL is incorrect, you won’t be able to access the channels.
- Verify MAC Address Registration: Ensure that your MAC address is properly registered with the Server Operator.
- Network Connection: Confirm that your Dreamlink box is connected to the internet via Wi-Fi or Ethernet.
- Reboot the Device: If you’re having trouble connecting, try restarting your Dreamlink box and reattempt the process.
Conclusion
Setting up IPTV on your Dreamlink T1 or T2 box via DreamOnline (DOL2) is an easy and efficient way to access a wide range of IPTV channels. By following the steps outlined above, you’ll be able to enjoy high-quality IPTV content directly on your television. The Dreamlink boxes, combined with the IPTV service, offer a seamless and enjoyable streaming experience for all your favorite live channels and on-demand content.
If you have any questions or need assistance, don’t hesitate to get in touch with us. Our dedicated team is always available to provide expert support and help you with any inquiries you may have, ensuring you have the best experience possible.Whether you’re new to IPTV or looking to optimize your setup, we’re here to guide you every step of the way.
We also invite you to explore our detailed pricing table, where you can find affordable plans that cater to various needs and budgets.
Additionally, be sure to check out our comprehensive list of channels, offering a wide range of content from entertainment to sports, news, and more. With our flexible options and diverse channel lineup, you’re sure to find the perfect plan that meets your entertainment needs. Contact us today to get started and unlock the full potential of your IPTV experience!